Basics: Spacebrew + Processing
/Introduction
This tutorial will get you acquainted with spacebrewP5, the Spacebrew library for Processing. We'll cruise through an included example, walk through the code, then learn how to set up a new app.
First time using Processing? First, download it. Then, follow Daniel Shiffman's excellent Hello Processing tutorial. Done that? OK, let's get going!
Setting Up
Get the library
First things first: download or clone spacebrewP5 from Github.
Install the library
- Processing keeps its libraries in a specific location on your computer, inside its sketchbook. On Mac, the sketchbook lives at ~/Documents/Processing. On Windows it's at (you guessed it!) Documents/Processing.
- Navigate to that folder on your computer (if you've run Processing at least once, it should exist). Inside, there should be a folder called libraries. You can make it if it doesn't exist.
- If you downloaded spacebrewP5, unzip it and copy the whole spacebrew folder into libraries. If you cloned it, copy spacebrew/dist/spacebrew into libraries.
- Your folder should now look something like this:
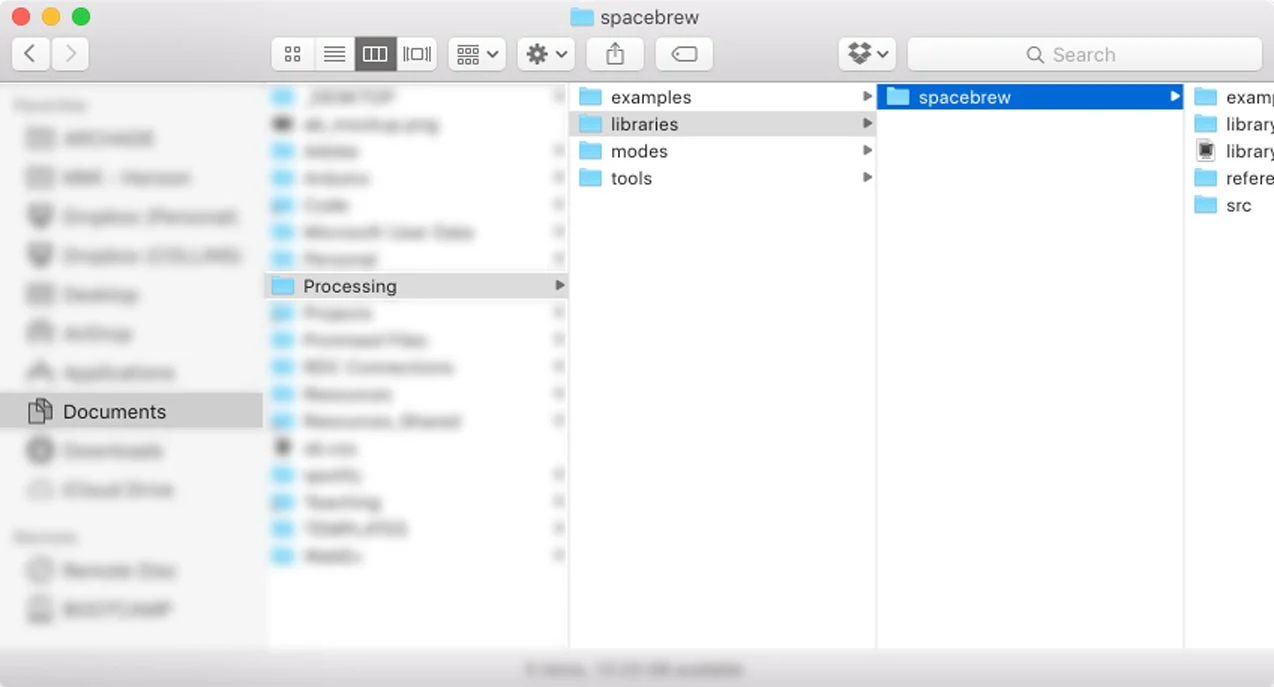
Spacebrew library in Documents/Processing/Libraries
TEST IT OUT
Open up Processing. Open the Examples menu (File/Examples). Under "Contributed Libraries" you should see spacebrew. Success!
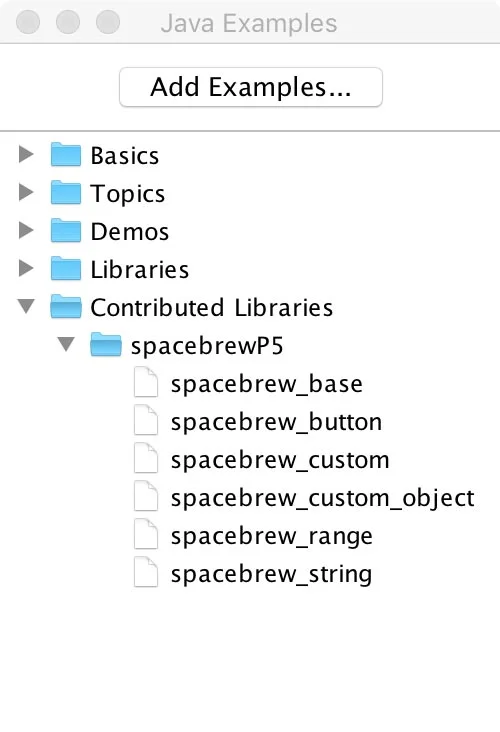
Why is this image so big? I'm not sure, but your excitement at this step should equivalently huge.
Troubleshooting
Stuck? Nothing's working? Check out Processing's extended "How to Install a Contributed Library" tutorial.
Getting Started: Button Tutorial
Open and connect the example
Open up the "spacebrew_button" example (see above!). Run it; you should see a lovely red circle. Press it. Barely anything happens! Wow! Let's make it do something.
Open up the Spacebrew Admin in Google Chrome (sorry, that's where it works best!). I like to use this nice short bit.ly: bit.ly/sbadmin-cloud.
You should see your app on there looking something like this:

Your example, unconnected
Connect "button_pressed" to "change_background". You're now connected!
All good? Return to your app. Click the button again... Woah, it changes background color now! How amazing! If that did happen, and you're not so blown away that you can't continue, jump ahead to "Breaking Down the Code".
Troubleshooting: If your app does not show up in the admin like above, post a message to the Spacebrew Google Group. Most likely, something weird has happened to the server. We'll fix it!
Breaking Down the Code
So, why is a color-changing app in any ways exciting? Because what's happening is your app is connecting to Spacebrew over the 'Net, sending data to it, and getting data back! Your button press could just as easily be controlling an interactive projection, a robot arm, or... a different Processing app. Woah!
Below is a break down from top to bottom of our code. Let's get into it
Import the library
All Processing libraries must be imported. Once you're installed, it's easy. Every Spacebrew Processing app you make should start with this:
import spacebrew.*;
SETUP THE CONNECTION
To make things simple and legible, when we at Spacebrew HQ write examples, we put the server, name, and description at the top of our apps where we declare our global Spacebrew variable. This lets your users easily adjust all of the above.
String server="sandbox.spacebrew.cc";
String name="P5 Button Example";
String description ="Client that sends and receives boolean messages. Background turns yellow when message received.";

Spacebrew sb;
The server determines what Spacebrew server you're connecting to. If you're testing online with the sandbox, it'll always be "sandbox.spacebrew.cc". However, if you're using your own server (or another local one), it could be "localhost", and IP address, or a hostname. Experiment with that later!
The name determines what shows up in the Spacebrew Admin. Important: there can every app connecting from your computer must have a unique name. So, if you make another button app, make sure you edit the name!
The description shows up in the "more info" rollover in the Spacebrew Admin. It's nice to write good descriptions for your collaborators.
The global Spacebrew variable (type: Spacebrew, name: sb) is your top-level access to your connection to the server. It's almost always going to be here!
ADD PUBLISHERS AND SUBSCRIBERS
In Processing's setup function, you're going to instantiate the Spacebrew connection, and then tell Spacebrew what you're talking about and listening to.
sb = new Spacebrew( this );
That's it! Remember: only do this in setup, only do it once, and instantiate before you do anything else. Easy!
// declare your publishers
sb.addPublish( "button_pressed", "boolean", true );

// declare your subscribers
sb.addSubscribe( "change_background", "boolean" );
Call addPublish and addSubscribe to add... Well, you get it. The format for these functions is as follows:
addPublish( Name, Type, Default Value );
addSubscribe( Name, Type );
Where "Type" is "boolean", "range", "string", or a custom type you create (see the "spacebrew_custom" and "spacebrew_custom_object" examples for some ideas around that).
Above, we're creating a publisher called "button_pressed" that sends a boolean (true or false). We're also subscribing to a route called "change_background" that's also a boolean. Simple! You can add as many (or none) publishers and subscribers as you want–so long as each have different names.
Connect
Once we have instantiated and setup publishers/subscribers, all we gotta do is connect. This ALSO should only happen once, in setup().
sb.connect(server, name, description );
Remember, we setup the server, name, and description variables at the very top. If you didn't set these up, you can manually pass Strings in here.
Draw
In this example, the drawing is pretty simple:
- We're setting a background color based on a variable
- We're drawing a circle
- We're drawing text over the circle depending on whether the mouse is pressed
Cruise through the code inside draw(). Not too bad, right? But where are we setting that currentColor variable? Could it have something to do with Spacebrew? Let's see...
SEND TO SPACEBREW
Sending to Spacebrew is a simple function on our Spacebrew object. The function's syntax is:
send( Name, Value )
Where Name is one of the publishers you added in setup(), and Value is what you want to send. Note, the type of the Value is connected to the Type of the publisher: boolean for "boolean" (...), String for "string", and int for "range".
In our case, we're sending as part of Processing's built in mousePressed and mouseReleased functions.
void mousePressed() {
    // send message to spacebrew
    sb.send( "button_pressed", true);
}

void mouseReleased() {
    // send message to spacebrew
    sb.send( "button_pressed", false);
}
EVENTS
OK, so we're set up with Spacebrew, sending data, and really getting wild. But how do we get data back from Spacebrew? In spacebrewP5, we add custom events–just like mousePressed and mouseReleased–to our app. In spacebrewP5 our custom events are:
onBooleanMessage( String name, boolean value );
onRangeMessage( String name, int value );
onStringMessage( String name, String value );
onCustomMessage( String name, String type, String value );
With each of these, "name" is the name of the subscriber you added. It's NOT the name of what someone is sending you. This is one of the trickiest parts of Spacebrew, but also one of the most powerful: you set up the incoming data, so you always know what's coming in.
So, when we connect "button_pressed" from our app to "change_background", any data that comes in has the name "change_background". We could connect 100 other boolean publishers to "change_background" and they would all still come in as "change_background". Let's look at the code!
void onBooleanMessage( String name, boolean value ){
    println("got bool message " + name + " : " + value);

    // update background color
    if (value == true) {
        currentColor = color_on;
    } else {
        currentColor = color_off;
    }
}
As you can see, we're setting the currentColor variable depending on the boolean value we receive. The "color_on" and "color_off" variables are declared at the top–they're just any easy way for us to store colors. Cool?
The one thing we're not doing, but do in other examples, is check for the name of the route. This is crucial if you have more than one route! If we wanted to do that, our event would look like this:
void onBooleanMessage( String name, boolean value ){
    println("got bool message " + name + " : " + value);

    // check for name
    if ( name.equals("change_background")){
      // update background color
      if (value == true) {
          currentColor = color_on;
      } else {
          currentColor = color_off;
      }
    }
}
In the if statement we're checking for the route with the equals function. That's it!
Conclusion
So, now you know how to make an amazing button talk and listen to Spacebrew! What's next? Try opening the other examples: start with "range" and "string", then move on to the "custom" examples.
Ready to make your own? Try using the "spacebrew_base" as a starting template–it'll make your life easier! Happy 'brewing!